

Skateboards decline in quality and performance over time. The process may not happen simultaneously in all parts, but you will have to attend to these issues when it’s time. One of the most common signs is your grip tape starting to wear out.
But just because your skateboard feels slippery doesn’t mean you need to buy a new one. Sometimes, you only need to learn how to change grip tape on a skateboard. With that, let’s get into the steps to regrip a skateboard.
Table of Contents
What You Need
- T-tool – We don’t want the board moving left and right while installing the grip tape. That means we need a T-tool to detach the trucks off the deck. But if you don’t have a T-tool available, you can also use a screwdriver and a hand wrench.
- Heating device – Heat is an essential element in softening the adhesive, making the grip tape removal process fast. Here, we can use a hair blower. Others use a heat gun, but it is not necessary in this case.
- Blades – Before we put grip tape on a skateboard, we’ll use a cutter or a razor blade to remove grip tape.
- Replacement grip tape – Specifically, you can use a grip tape with a grit level of around 50S to 80S, which is tailored for technical skating, cruising, and freestyle.
How to Replace Skateboard Grip Tape
Step 1: Preparing the skateboard
We can’t replace grip tape without taking off the skateboard’s trucks. Otherwise, we can’t make our work precise due to a moving deck.
So, let’s grab our T-tool or screwdriver. Start to unscrew the bolts holding one of the trucks. Do the same to the other truck and secure all the hardware in one location for re-installation.
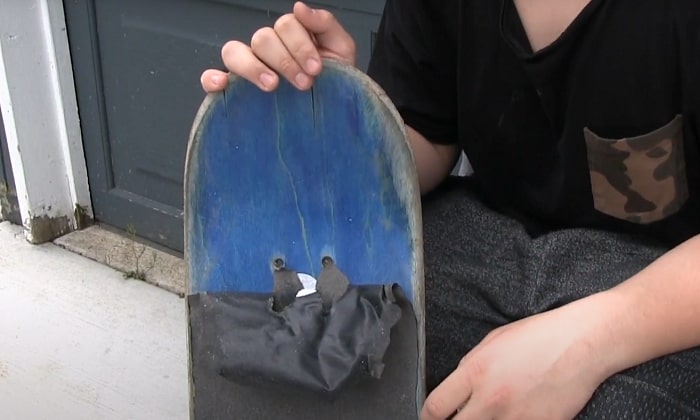
Step 2: Remove old grip tape
Perhaps, this step is one of the most challenging when replacing grip tape. It requires effort and patience to take grip tape off from the deck.
Start by heating the deck with your blower. Point the nozzle on the sides of the deck and run it a few inches back and forth. Keep warming the adhesives until you can finally insert the blade or cutter between the grip tape and the deck.
Slide the blade on the heated areas and pull the grip tape from the side. Be careful about the blade’s angle so that it doesn’t tear the deck’s finish.
Note that this step to remove grip tape from the skateboard should be done gradually. That means we cannot heat the whole deck at once because the adhesives will cool down and be back to being stiff. Finish the heating and pulling for one area before moving to the next.
Repeat the process until the whole sheet of grip tape is off the deck.
Step 3: Cleaning the deck
The best way to ensure the deck looks new when we finish is by cleaning it of old grip tape residues.
Scrape off the remaining adhesives on the deck’s edges using your blade. Use your blower should there be grip tape portions left on the middle part of the deck.
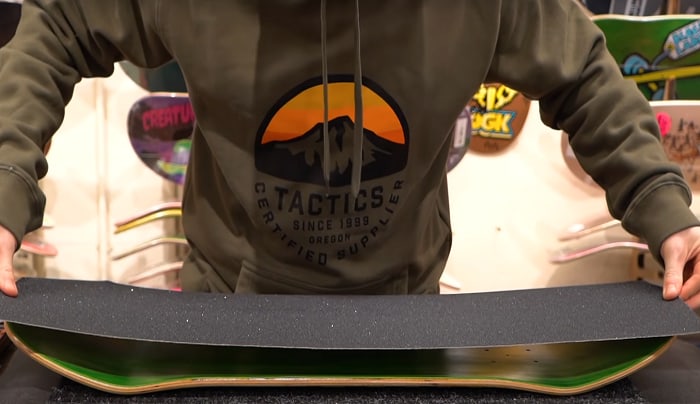
Step 4: Putting on the new grip tape
Before we install grip tape on the deck, we have to plot it first to ensure it has enough size to cover the entire stepping surface.
Placing the deck horizontally, hold the new grip tape over it. Press the gritty pad against the deck as if you’re installing it.
After making sure you have enough grip tape, start pulling its non-adhesive cover parallel to the area where you want to put on grip tape first.
Mount the adhesive side of the grip tape, starting on the nose or tail of the deck. Slowly peel its non-adhesive side and press it on the deck while heading towards the opposing direction of the nose or tail.
Make sure to do this step from one end of the deck to another. You cannot press grip tape at any corner you want because it can only cause air bubbles to form.
Step 5: Trimming off the excess grip tape
After sticking the grip tape on the deck’s surface, it’s time for the second cleaning round.
Fold the excess grip tape down. The marks will be your basis when cutting it. Make these folds on all sides of the deck.
From there, flip your deck with the bottom side facing up. Grab your blade as you cut the grip tape based on the lines left by the folds you made.
Step 6: Finishing up
Grab some of the removed grip tape and fold it with the adhesive sides facing each other. Use it for sanding the edges of the skateboard deck to ensure it has a smooth finish.
Next, take your T-tool or screwdriver and put some holes in the grip tape at the truck bolt locations. Grab your skateboard trucks and begin installing them.
Conclusion
In any sport or physical activity, we always have safety measures. And in the case of skateboarding, one of them is the grip tape.
Because this part is likely to wear out, it’s best to master how to change grip tape on a skateboard. That way, you get to maintain your safety and ensure quality rides. Remember the best practices I have shared to guide you in this process.
Should you have inquiries, kindly leave them in the comments section.

Hi, I am Charles Harris. I opened this site to write as much as I can about my biggest passion – skateboarding!
I started as a clumsy yet passionate rookie 10 years ago to now a still passionate yet much better skateboarder! But I have to tell you, the whole journey has always been fun and rewarding, indeed not without hardship.