


Once you have bought your longboard, the next thing you should learn is how to do longboard assembly.
You can learn how to assemble a longboard without ever having to read the instructions that may be included with the board.
You don’t have to have experience working with wood, but you do need a few basic tools and some patience. Putting together your own longboard can be a lot of fun and extremely rewarding if you enjoy doing woodwork projects.
Nearly all new longboards come with a variety of parts and hardware that need to be assembled prior to riding. I have compiled this assembly guide to help you get on the road.
Table of Contents
Steps to Assemble a Longboard Instruction
1. Installing a Grip Tape
In order to finish the project, you will be required to procure a sheet of grip tape, which is generally already cut for installation. If not, the grip tape can be cut using a cutter or the edge of a blade.
You will also need a metal bar to sand down the edges of the grip tape. You can get a screwdriver for this.
To begin, stand at one end of the deck — the nose or tail. Place the grip tape over the deck when leveling with the deck; the sheet of grip tape should extend over the opposite end of the deck by at least one inch. At this point, you can start putting the grip tape on the board.
Work throughout the board. As you go down the deck, the grip tape should be straight and extend a bit over the edges. Make use of the screwdriver’s rounded end to smooth down the grip tape, creating a visible white line on the surface.
Cut off the excess parts of the grip tape with a razor or box cutter. Look closely at the line you drew with the screwdriver in the previous step, since it can be your guide and the material there is easily broken.
Once the excess has been removed, your board should look virtually finished in terms of visuals. This is crucial if you want a good longboard setup.
2. Installing Longboard Trucks

Installation of the Top Mounted Version
Top mounted trucks will be attached underneath your deck instead of hanging over the sides. Use a screwdriver to pierce into the holes from underneath the deck and work your way up to the top. All screws should be placed on the top of the board, then the board should be flipped upside down, with the bottom facing up.
You may use the screws and the baseplate to put trucks on a longboard. If you’re using risers, it’s highly recommended that you set them up first.
Placing regular kingpin trucks so that the bushing and the kingpin are inward-facing is advisable.
For the reversed kingpin truck, the bushing and kingpin should face outward, towards the nose and edge of the longboard deck.
Installation of the Drop Through Version
Drop through trucks are attached to your board from the upper side and drop through a hollow spot into the board.
Before installing drop-through trucks, taking them apart is necessary. The first step is taking out your kingpin nut. Afterwards, you must remove the bushing, washer, and hanger.
Ensure the kingpin is through the drop-through mounting hole. You can do this by positioning the base plate on top of the deck.
You’ll have to reassemble the trucks before you can install longboard trucks. Do the former after you’ve set up all base plates and picked your bushings.
3. Placing the Bearings
The first step is to insert the bearings into the available sockets.
When you flip your skateboard over, hold one of the axles with one hand and slide on a bearing with the other.
Place a spacer (if you have one) above the bearing and before the wheel. Start pushing the bearing to the socket of the tire with overhead tension.
Gradually, you’ll feel the bearing move into place. To set the second bearing, repeat the cycle as you did on the first one. All that remains is to put the final three wheels on.
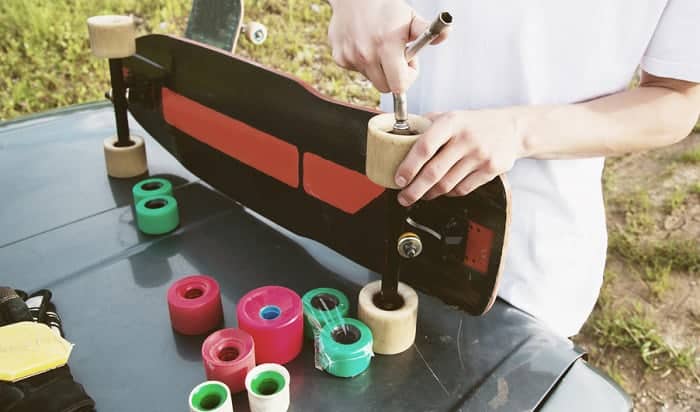
4. Lodging the Wheels
It’s time to connect the wheel assemblies to the platform. First, place a washer on each of the wheels. Next, slip on bearings. Then, put another washer on.
Finally, put on the lock nut, which holds the wheel and tire assembly in place.
Flip the board so that you may attach the tires on the opposite side. Repeat the procedure.
Theoretically, you can ride your board now. But you should go through everything a few times to be sure that all parts have a place and that everything is properly arranged.
Conclusion
Longboards have been around for a while now and if you haven’t tried one out yet, then you are missing out. Assembly is easy when you have all the right tools and parts. It is now even easier with the help of our longboard truck guide, as well as other components.
Make sure that your workspace is safe. Be careful of sharp objects while building your longboard. Make sure your longboard trucks set up’s done and the deck is ready to go — examine your board and ensure that everything is where it should be, and then make the required corrections. Have fun with your longboard!
And if you like our article on how to assemble a longboard, please share it with others!

I am Michael, and I have been enjoying this fun sport for seven years. And nothing is better than having a community to share our passion for those thrilling tricks. I am ready to tell you all I know about skateboarding, showing you how to choose a good board and trick to start and how the practice goes. Stay tuned!