

Longboarding is not just an excellent form of exercise, but also a unique way to experience transportation. Longboarding has become a great pastime for many; however, knowing where to start can be difficult and time-consuming.
Building your first longboard can be daunting and expensive! Not anymore with our simple instructions for how to build a longboard.
Here is a step-by-step tutorial on how to build your own longboards from scratch. It will walk you through everything from shopping for materials and tools to painting and adding accessories.
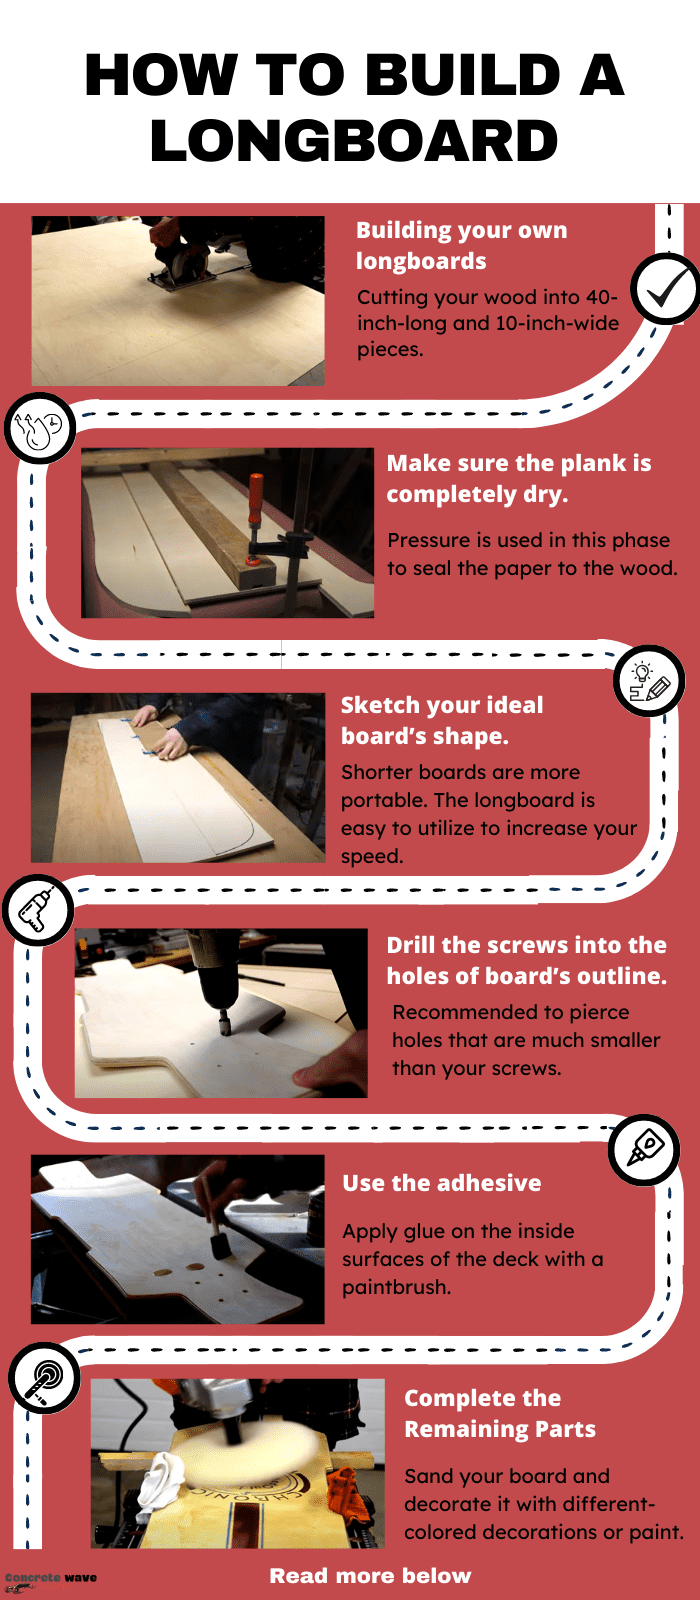
Table of Contents
Preparing the Tools & Materials

1. Use whichever wood appeals to you
A low-cost board may be created using two to three inches or four to six-and-one-eighth inches of thick plywood. If you want, you may use 8 plywood sheets, which are a millimeter in thickness. You will have to prepare an adhesive and screws since all these components will be attached to your project.
Depending on how much flexibility you want, the number of sheets you employ will change. We advocate using multiple layers of maple for a more robust board.
Buying an already pressed deck and building your own longboard may also be a good idea.
2. Decide on your adhesive and trucks
To ensure that the binder is of the highest quality, ensure that you’re using high-grade epoxy or glue. These products can be purchased at either hardware or building supply stores. The glue’s main role is to keep the pieces of wood stuck together. Because of this, anticipate your deck to be of low quality if you choose a cheap and low-grade glue.
Metal is used in the construction of deck trucks. Trucks are paired with the board’s wheels, which will enable you to lean in order to spin the board. If we want a fantastic longboarding experience, it is absolutely necessary that we select proper trucks for our board.
Reverse kingpins are highly suggested for those who want to make a longboard with nice trucks. However, if you want to build a longboard and attempt to do ollies with it, then this sort of truck is not appropriate for you.
When comparing the reversed ones to the standard, the reversed trucks will provide you with superior turn reaction and stability, but the regular will have fantastic pop.
3. Select the wheels you want
Buy a rigid wheel if you want a hazardous ride on your longboard. A tougher wheel is less likely to stick since it slides more easily.
You may want to get a wheel with a high durometer if you want to do a lot of sidewalk longboarding.
If you want to use your longboard often, I recommend getting at least a 75A wheel as it will create a more significant influence on your skating experience.
Difficult turns may be achieved by using wheels that are soft.
4. Additional tools
- Grip tape
- Pencil and paper
- Varnish or resin
- Drill, screws, and nuts
- Sandpaper
Guide on Building a Longboard Deck
Consider cutting your wood into 40 inches long and 10 inches wide pieces. If you wish to increase the length of your boards, you may add a small bit of material. You have the freedom to choose since you are building your own longboards.
You don’t have to concern yourself with the board’s form. When you push the materials together, you’ll form the shape of it.
Draw a line as long as your chosen measurement on a paper. This line will serve as your board’s center line.
The following step is to sketch your ideal board’s shape. Divide your sketch into two to create a symmetrical board.
In order to create the most suitable board for yourself, think about all the many ways you’ll use it. Shorter boards are more portable. The greater in length the longboard is, the easier it is to utilize to increase your speed.
Before you start carving the form of your board on the wood, make sure the plank is completely dry. Then, draw your board in the manner you visualize it to be. Pressure is used in this phase to seal the paper to the wood.
Drill the screws into the holes of your board’s outline. It is recommended to pierce holes that are much smaller than your screws. The quantity of screws will be based on the size of your board. There is no specific number for all kinds of longboards.
Use the adhesive that you prefer. Apply glue on the inside surfaces of the deck with a paintbrush. Next, you will put the timber pieces together. If you drilled the holes and the holes are seen on the surface of the board, then you did a good job.
Guarantee that the stiff side of the deck is on top when stacking the pieces of wood.
Put some screws on the holes near the nose of your board. Next, you would apply some degree of pressure on the top surface of the board. Additionally, make sure to keep certain areas unglued to avoid accidents.
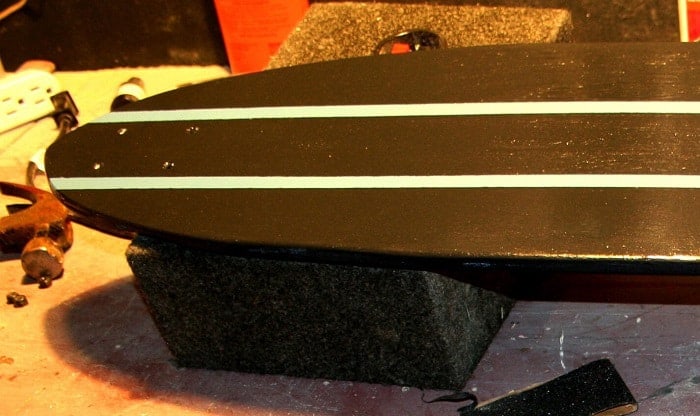
Let the adhesive dry. Then, sand your deck.
Complete the Remaining Parts
Once your board has been sanded, it is time to get your creative juices flowing. This process depends on each person as to whatever unique style to choose for the board.
For those of you who want to use your own longboard with classic designs, the natural wooden pattern might be more to your liking. Even if you might choose to use paint on it, you might want to consider whether or not you would want to create any design.
To make your board stand out, use different-colored decorations or paint. You can utilize a stencil to mark your design.
Add a coating of varnish to enhance the appearance of the finish. To ensure your design is well sealed, apply a layer of polyurethane varnish or fiberglass resin. Make sure to use clear coatings so your carefully-crafted design can be seen.
It’s important to choose durable grip tape because it will cover the whole deck. While riding at great speeds, the grip tape has the ability to assist you in maintaining your grip on the board. Also, be sure to apply it onto your deck properly.
Using grip tape is like using a sticker. A pair of scissors or a cutter will allow you to cut away the extra grip tape on your board.
Barefoot riding works best when the board is waxed. Applying wax on the deck should be prioritized if you ride your board without socks and shoes.
To fit the tires, you must place the bearings first. Try to avoid overdoing it. Before you go any further, secure the wheels. It is important to utilize tight-fitting nuts in order to allow easier wheel rotation. Accidents when longboarding may occur if the wheels are not properly positioned, so make sure to check them.
Conclusion
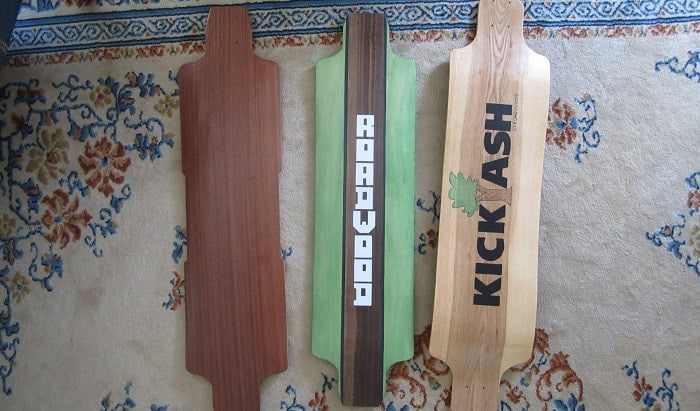
A longboard can be as simple or as elaborate as you want to make it. It’s up to you whether the deck should be a solid color, printed with lettering and graphics, or completely painted with a cool design. A selection of aluminum trucks, wood decks, and rubber wheels are available that will best suit your style.
Longboarding is a way of life, a hobby, and a social activity. Take advantage of our tips on how to build a longboard to increase the enjoyment of this exciting hobby. Go from knowing nothing about making your own longboard to confidently making one yourself.

I am Michael, and I have been enjoying this fun sport for seven years. And nothing is better than having a community to share our passion for those thrilling tricks. I am ready to tell you all I know about skateboarding, showing you how to choose a good board and trick to start and how the practice goes. Stay tuned!