

Creativity knows no boundaries. It mixes well with skills and talent. And no matter your passion, there is always room for innovation. Yes, even with skateboards.
There are many ways to apply creativity on skateboards. One of these methods is installing custom graphics. Another one is by lighting it up. Wait. Is lighting up a skateboard possible? Like in Roblox? Absolutely!
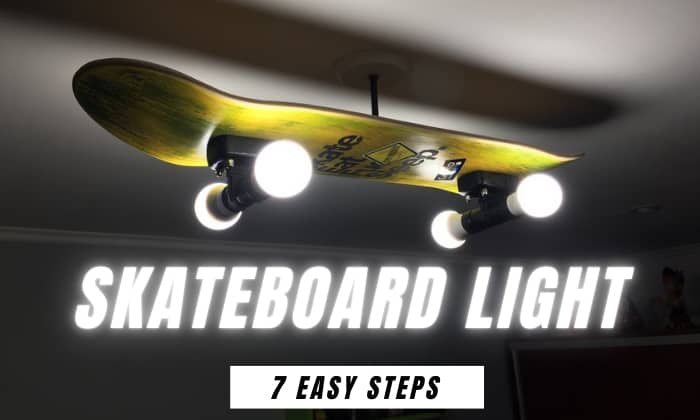
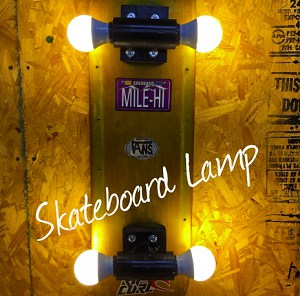
Today, we will teach you how to make a skateboard light for any purpose you want. At the end of this tutorial, you might be able to finally design your room with a skateboard ceiling light or a skateboard lamp.
This project is going to be fun. So, pick up the bulbs, and we’ll start rolling.
Table of Contents
What to Prepare
Before we give you a list of the tools for a skateboard light kit, note that we will work with electronic components. So, stay careful throughout to prevent harm and damage. Here’s what you need for a skateboard light fixture.
- Stationery tools – This project requires accuracy with measurements and plotting of parts. So, keep a few stationery tools like pencils and rulers with you.
- Skateboard deck – Whether old or new, it’s solely up to you. Just be mindful of the fact that it will serve as the mounting spot for the bulb sockets.
- Light bulbs – To light up wheels, we will use real bulbs. Like the skateboard deck, your preference prevails over what bulbs to use. You can use a colored bulb, filament bulb, LED light, or other types that land within the allowed electric load.
- Drill and drill bits – Depending on our installation and desired lamp location, we will drill holes. So, with the power drill, prepare various sizes of drill bits for wood, metal, or other surfaces you may use.
- Electric wire and plug – These electronic parts move power to your bulbs. When choosing, ensure they’re of an appropriate thickness and sufficient length.
- Vise grip – Vise grips are pliers with locking features that help you stabilize an object while cutting it.
- Coaxial cable connectors – These small tools will connect and protect cable junctions. You will only need two of these.
- Twin bulb sockets – The twin sockets will act as the holders for your skate lamp. What’s the best material for these parts? Porcelain.
- Philips head screwdriver – We could be mounting and patching things using screws. So, try to keep a screwdriver with you.
- Stranded wire – The best wire for this project is 14-gauge, which is ideal for 15A lighting.
- Electrical connector box with screws – This box will be the enclosure of wires and other electrical components of your lamp.
Steps to Make a Skateboard Light
You could create a skateboard lamp bedroom that’s cooler than any you’ve ever seen. So, stay focused on the following steps to guide yourself and make a stunning DIY skateboard light.
Step 1: Prepare the skateboard deck.
Suppose you already have a bare skateboard deck without trucks and wheels. Use your pencil and ruler to find the center of the four truck bolt holes on each end of the board.
Lay your ruler on the bottom surface of the deck. Connect two bolt holes diagonally using the ruler. Mark the diagonal lines with your pencil. Repeat the same process with the other pair of bolt holes and the other side of the deck.
Drill into the spot where the diagonal lines meet. The hole there will serve as the slot for your coaxial connectors. So, how big should these holes be? Use a 5/16 drill bit to match the width of the connectors.
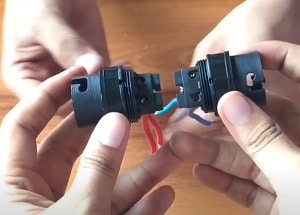
Step 2: Prepare the coaxial connectors.
We mentioned how these connectors are vital in linking electronic components.
Grab your drill again and use a 3/16 bit. You will have to pull the plastic core off the connectors. So, hold one coaxial connector using a vise grip and use the other hand to drill the plastic center. Afterward, the plastic will fall out.
You will notice that the opening of both ends of the coaxial connectors is a bit small. In that case, stretch the holes using a 1/4 metal drill bit.
Step 3: Install the connectors.
In this step, we will fix the link of the wires between the top and bottom surfaces of the deck. Our goal is for the deck’s newly drilled hole to hold the connectors firmly.
So, take one coaxial connector without its plastic core. Slide it in one of the holes we drilled. But we will not simply push the coax connector through the board. Instead, we will use its threads to get a firm seat on the deck’s hole.
Rotate the connector clockwise while pushing, like tightening hardware. Does the small conduit fit? If not, try to expand the deck’s hole using a drill or a round file. Be careful not to over-expand the holes. Otherwise, the coaxial connectors will fall off easily.
How do we know the connector fits perfectly? It’s when you can no longer move it, and half of it sticks out on one side of the board.
Step 4: Install the bulb sockets.

There might not be much to work on in this step because coaxial connectors have male ends and bulb sockets have female threaded connectors.
Before you do this step, see if there is a lock screw on the female threaded connector. If so, try to loosen or remove it.
Next, fix the double sides light bulb socket on the coax end at the bottom of the deck. Twist the sockets until they barely turn.
How do we know the socket sits perfectly? It should look like we’ve installed trucks on a skateboard with the socket’s direction parallel to the deck’s width.
You might have noticed that there is no wiring yet. Yes. We’re only testing how the sockets sit on the deck.
Step 5: Wire things up.
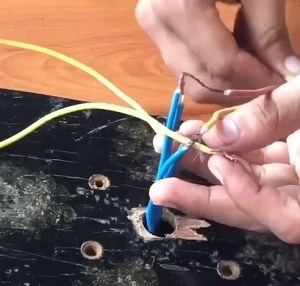
When you examine a twin socket, you will notice the female threaded connector attaches to a metal plate screwed on the porcelain body. And if you unscrew the plate, that is where we connect the wires.
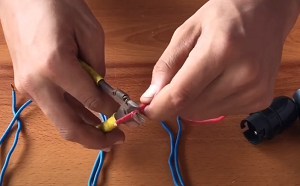
Grab your wires and prepare four 12-inch pieces. Cut half-inch insulation layers off each wire. Suppose you already removed the metal cover, connect the stripped parts of two wires to the socket’s terminals.
Slide the insulated ends of the wires through the metal plate and the female connector. Screw the metal piece back into the porcelain socket with paper or cardboard. Then, slide the same wires through the coaxial connectors on the skateboard.
Mount the bulb socket to the skateboard deck as described in the previous step. Secure the light mount using the lock screw.
Step 6: Fix the connections
Now that we have the socket wiring popped through the stepping surface of the board, it’s time to connect them to the power supply and plug.
At this point, you have two wires coming from each of the tail and nose sides of the deck. Like the previous step, strip half an inch of insulation off the four wires. Additionally, perform the same step on the power supply cord, which has two stuck wires with separate insulations.
Quick recap: We have four wires from the bulb sockets plus two more wires from the plug. Slide the ends of the socket wires through the electrical box. Connect one wire from the nose to another from the tail. Then connect them to one of the two power supply wires.
Repeat the same process with the rest of the wires. Try to use twist-on wire connectors to ensure the three-way wires do not lose connection.
Now, you have two combinations of three different wires. Flip the electrical box and fix it on the deck’s stepping surface using screws.
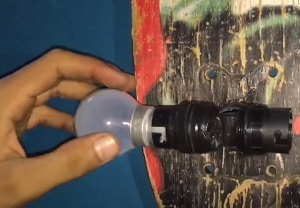
Step 7: Attach the bulbs.
Finally, we have connected the plug wire to the socket wires and bulb houses at the bottom of the deck.
Now, grab your bulbs. Install each one like you twisted the bulb sockets against the coaxial connector. Be careful when installing these lights to prevent them from breaking.
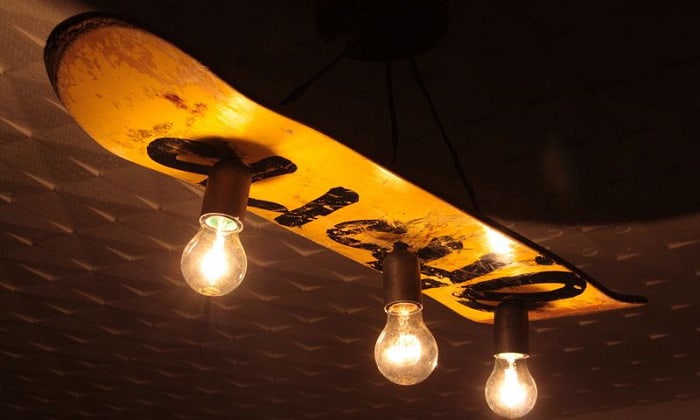
Once the bulbs are in place, you can test your deck truck lamp. And if all the lights function well, you can proceed to display the lamp as a wall light, ceiling lamp, or however you want.
Conclusion
Designing skateboards is fun, and so is making a lamp out of an old deck. And while these could be two different projects, there is one thing that binds them: creativity.
Who would have thought we could light up skateboard deck? Now that you know how to make a skateboard light, perhaps, this tutorial opened your mind to more things you can do with your board.
Remember, we only need the right tools, patience, and carefulness. With them, possibilities become endless. It’s time to illuminate your place with a lighted skateboard!
Read more:

Hi, I am Charles Harris. I opened this site to write as much as I can about my biggest passion – skateboarding!
I started as a clumsy yet passionate rookie 10 years ago to now a still passionate yet much better skateboarder! But I have to tell you, the whole journey has always been fun and rewarding, indeed not without hardship.