

This article will show you how to make a skateboard mold for your custom design. First stop, think about what materials you’re going to use. Here we have a wooden mold for your DIY skateboard press.
There are various pressing methods you may apply in creating a skateboard. In this article, I’ll be discussing steps to make skateboard mold from wood, which shouldn’t be costly. Remember, this might take time, but it is not that difficult to follow the instructions. Before you start, make sure you understand the entire process.
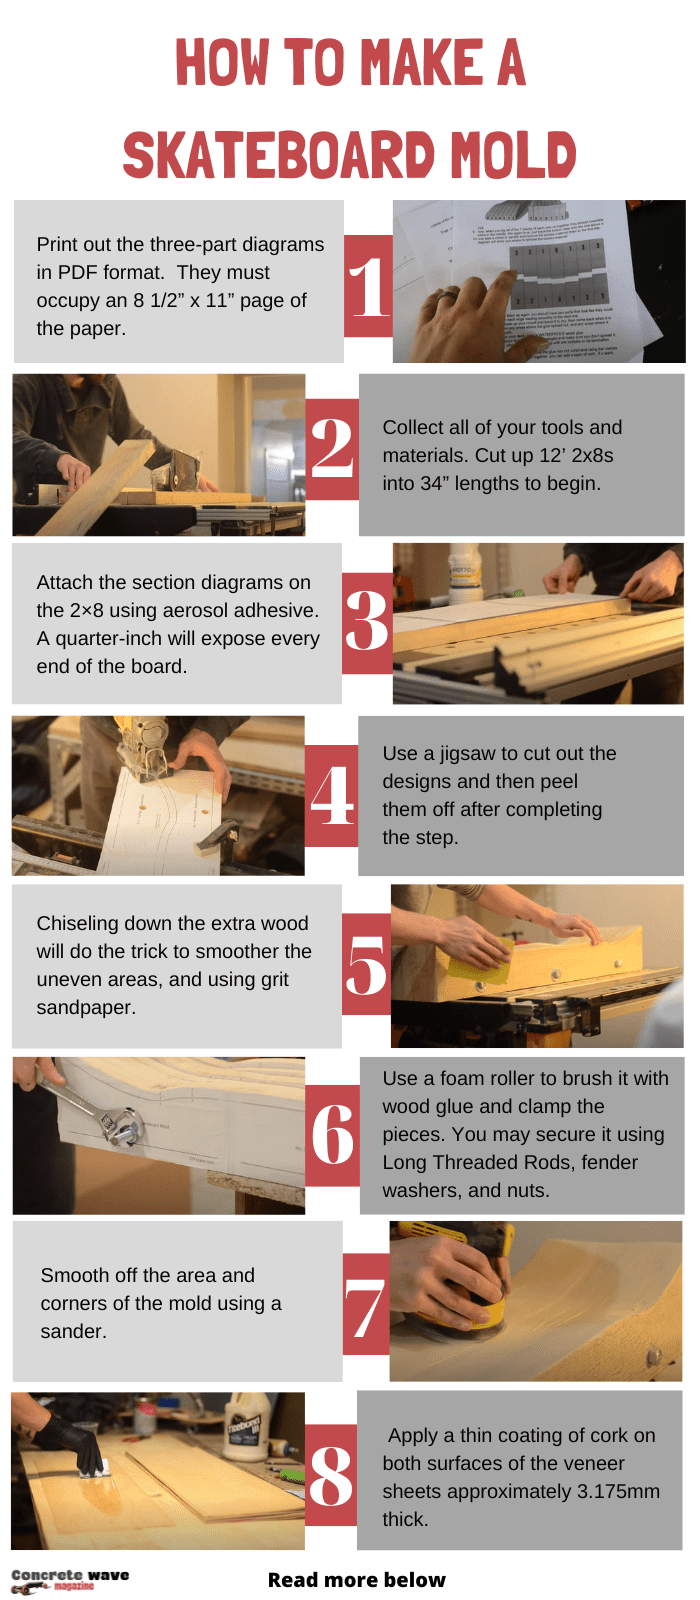
Table of Contents
What are the Materials or Equipment Needed for Making a Skateboard Mold?
Here are the necessary tools and equipment that you will use to make a skateboard mold template. It’s also listed here the materials for the wooden mold that you need. Remember that this may take a lot of time, but the procedures shouldn’t be that hard; just read all the instructions below:
- Long Threaded Rods: To fasten or connect two materials, efficiently as a pin. They may be placed into various materials, including cement, wood, or steel, to establish a solid base or permanently stabilize objects temporarily.
- Fender Washers: The Washer’s function is to distribute pressure during the tightening procedure by increasing the bearing area for some other load that the fastener supports.
- Nuts: It’s a type of fastener with a center threaded hole, a partner of the bolt.
- Tape Measure: A tape measure is for measuring the length or size. The readings of a measuring tape might be in imperial, metric, or a combination of the two.
- Uncut Skateboard Deck: Uncut skateboarding decks are pieces of wood shaped like a surfboard. This piece will be helpful in the molding procedures. It will serve as a guide in making a custom skateboard of your own.
Wooden Skateboard Mold:
- Sturdy Wood: As a result of their cheaper cost and efficiency, softwoods like fir and pine are frequently used for painting, trimming, and molding. It’s even easier to use at working woodcraft.
- Bandsaw, Or Jig-Saw: Using Bandsaw or Jigsaw, you can carve curvature in thick pieces of wood using the Bandsaw or Jigsaw. On the other hand, the primary purpose of it is to cut complex patterns.
- Two Bar or Quick-Grip Clamps: Used for bonding woodwork parts, attaching wooden beams, and DIY stuff at home like what you’re about to do.
- Foam Roller and Tray: These tools are necessary to apply the adhesive and bind the wooden parts together.
- Grit Sandpaper: On unpolished woodwork, finer grain sandpaper is ideal for eliminating scratches caused by rougher grits.
- Chisel: Cutting equipment having a sharp steel edge, commonly struck with a hammer or mallet, to trim, shape, or carve solid materials like wood.
Procedures for Making a Skateboard Mold
In this part, for step-by-step directions on making your skateboard press, kindly check the details in the instructions, and let’s begin! And also, I would like you to keep on reading and don’t skip to the end so that you won’t miss anything.
Wooden Skateboard Mold:
Print out the following three-part diagrams in PDF format. To scale using these segment drawings, it should be the same dimension as your wooden mold when printed. In addition, the upper and bottom parts of the wooden skateboard mold are in each part of the Printable design.
Here are the step-by-step instructions:
Step 1: To ensure the accuracy of PDF segment illustrations, they must occupy an 8 1/2” x 11” page of the paper. Segment drawings prepared in PDF format may be pieced together end-to-end.
Step 2: Collect all of your tools and materials. Cut up 12’ 2x8s into 34” lengths to begin. So, there will be seven pieces needed.
Step 3: Attach the section diagrams on the 2×8 using aerosol adhesive, being sure to align them. A quarter-inch will expose every end of the board.
Step 4: Use a jigsaw to cut out the designs and then peel them off after completing the step. You may also opt to trace the images if you want.
Step 5: Chiseling down the extra wood will do the trick to smoother the uneven areas, and after that, use grit sandpaper.
Step 6: Once, they resemble a skateboard mold. Use a foam roller to brush it with wood glue and clamp the pieces until they form a strong bond. You may secure it using Long Threaded Rods, fender washers, and nuts.
Step 7: If the adhesive is completely dried, go ahead and smooth off the area and corners of the mold using a sander. Ensure that you don’t remove much wood this time. Work well here using a circular sander with 60-80 grit sandpaper. When all the corners match, apply finer grain sandpaper until the surface is completely smooth.
Step 8: It is advisable to apply a thin coating of cork on both surfaces of the veneer sheets approximately 3.175mm thick. To correct the mold flaws when pressing a deck with this wooden mold.
Pro tips: In the procedures listed above, it is advisable for you to have a visual representation of the actual making process of the wooden mold, which you may refer to in this video.
Final Thoughts
Last but not least, the accuracy of your wooden skateboard mold press depends entirely on you. Give the best shot, and be patient.
Fortunately, we’ve offered you all the information and tips you need on how to make a skateboard mold efficiently. I’ve already stated that reading through all the instructions will ensure the desired result for your wooden press.
While you’re getting ready to do this, did you manage to find this article guide helpful? If that’s the case, feel free to share this article with others.
Read more:

I am Michael, and I have been enjoying this fun sport for seven years. And nothing is better than having a community to share our passion for those thrilling tricks. I am ready to tell you all I know about skateboarding, showing you how to choose a good board and trick to start and how the practice goes. Stay tuned!