


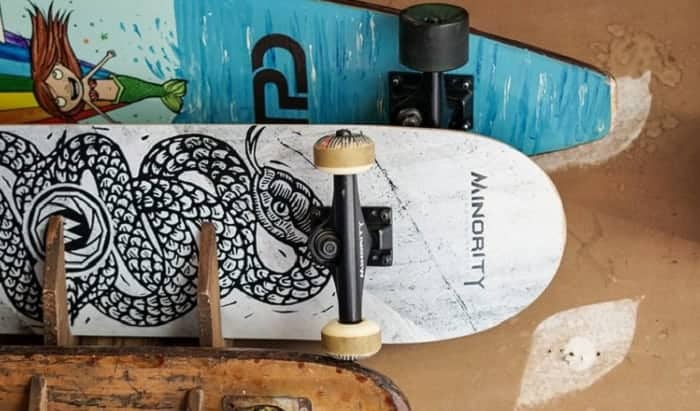
Whether you want to showcase your longboards in the living room or arrange them in your shed, a skateboard rack can match your board’s aesthetic. Indeed, you can create cool skateboard rack plans that are both stylish and custom-made for your decks.
This rack will store your boards upright, leaving plenty of room for trucks and, of course, wheels. It will fit in any space, but the higher the ceiling, the more boards it will hold. Thus, here is a simple method on how to make a skateboard rack.
Table of Contents
What We Need

There are several options for storing your skateboard, and if you’re prudent, it won’t cost you anything. Don’t limit your search to skateboard racks or skateboard storage; think creatively. Several mounting solutions enable you to stow your skateboard on a wall. All you need is anything to put a wall that supports your decks.
Though you may create it according to your idea or plan, I will attempt to provide a simpler method for building a skateboard rack that will assist you in organizing your large collection of skateboards or longboards. It’s effortless to create a practical yet nice-looking rack. Simply ensure that all measurements and drilling operations are carried out accurately regarding their measures.
- 2 four feet wooden planks
- 2 two feet wooden planks
- 10 pieces wood dowels with 1-inch diameter
- 8 pcs #8 wood screws
- 4 pcs #6 drywall screws
- Wood glue
- Double-sided tape measure
- Pencil
- Hand saw
- Drill
- 1-inch drill bit
- 3/8-inch drill bit
Creating the Rack
Step 1: Choose the materials.
The first thing you’ll need to do is choose the material for your DIY skateboard rack. Fiberboard and plywood are ideal. Medium-density fiberboards will not hold up as well as plywood, but many skaters prefer it since it is easy to shape and has a sturdy and shiny surface.
Step 2: Identify & measure centers.
I’m constantly looking for methods to save time. In this example, the skateboard holder will stack five boards. This entails identifying and measuring five centers and angles. After that, I’m going to drill the holes and cut the slots.
Step 3: Use tools to make your process efficient.
The usage of double-sided fabric tape can halve our effort. This material is available at almost any carpentry supply store and online marketplaces. This will act as a wedge between the two sides, allowing us to measure, draw, punch, and chop them all at once, resulting in two precisely matching sides!
Step 4: Angle all the slots.
To create those angles, I marked the board’s centers at intervals of 8 inches. If you like, you may alternatively mark every 6.5 inches with a 1.5 inch for the board slot.
Repeat the process on the front face, but shift everything by precisely two inches. In other words, your first tick mark will be at 4.5 inches on the face, and your first tick mark in the middle will be at 6.5 inches. This will provide the angled slots we require.
Step 5: Prepare to use your drill and bits.
This hole will round the backs of the openings, rather than making them rectangular. If you don’t have a 1-inch drill bit, you can round them over with the saw, but it will be much more difficult and will take a lot of polishing and filing to smooth them out.
I wanted my skateboard rack DIY to be a little more practical and beautiful than a piece of plywood with slots cut into it. To do this, I used a quarter-inch round-over bit to make the slots rounder.
These round-overs will make it far simpler to slip skateboards into and out of the rack spots. Due to the 3/4-inch thickness of the plywood, I utilized the quarter-inch round-over bit again. I propose that you use a round-over bit about a quarter of the width of the material you are working with.
I cut four ten-inch-by-six-inch stretchers for the back and screwed them in place. Also, I cut a hole into the bottom of the skateboard rack to allow clearance for my baseboards. You’ll need to determine the size of your base and cut yours to match.
Mounting the Skateboard Rack
Step 1: Determine the placement of the skateboard rack.
Measure approximately five feet from the ceiling to the ground and make a mark with chalk. This is the highest position of the left vertical support, which will alter based on your preference.

Repeat this step, this time marking a place two feet to the right of your first pencil mark, but at the same height. This will be the location of the right-standing support.
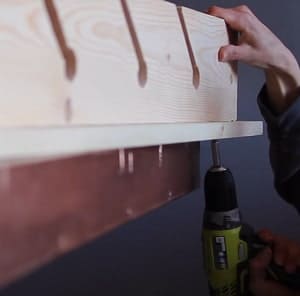
Step 2: Attach the drywall screw.
Inspect the rack’s orientation by reversing it against the wall. The board should align with the wall marks you created. Attach a drywall screw to the rack’s top-left hole. Ensure that you secure it to the wall frame.
Step 3: Check the rack’s level.
You may check the rack’s level after inserting the second drywall screw into the hole at the top right part. Once aligned, the skateboard wall rack should be adequate for holding its weight.
The final two drywall screws are for connecting and securing the boards in the bottommost section.
Step 4: Drill holes and mount the rack.
Please make holes of consistent thickness, as this will impact the distance between the pieces of wood and the rack. Measure 1.5 inches from the tip of the drill bit using fabric tape. You can continue drilling until the taped portion of the drill makes contact with the timber.
If you keep your skateboards properly, they will remain in good shape. While performing the instructions above, you can protect your body by rolling on a foam roller. Ascertain that you are safely working on your knees.
Storing Your Skateboard Properly
Even though skateboards are designed to be destroyed, elements such as rain, sand, dust, and sunlight may all be damaging to your skateboard. Treating your board properly includes avoiding skateboarding in the wet and storing it properly.
While you may always purchase new components, this is a complete waste of money. The following are a few reasons why storage is critical:
- When your trucks become wet, they can begin to oxidize.
- When exposed to the sun for an extended period, bushings dry out and cease to function correctly in extreme heat.
- When bearings become wet, they cease to spin, and cleaning is ineffective.
- Your deck should never be damp since soggy decks quickly lose their pop and snap.
- Finally, if your hardware oxidizes, your trucks may detach.
Conclusion
From constructing the skateboard rack to the DIY skateboard wall mount, all necessary procedures are demonstrated. They’re effortless to make as long as you have the necessary supplies. It’s a method to recycle items while obtaining a beautiful, unique piece of wood that may contain some of your belongings.
By the way, I believe you are a person who loves to collect and experience different types of skateboards. If you are interested, we have compiled some of the most popular skateboards, such as carver, pop and cruiser skateboards.
If you’ve acquired something truly unique, ensure that it’s properly stored using the techniques indicated here or anything else that comes to mind. Simply be certain that you protect your deck; some decks are simply too unique to destroy. The choice is yours on how to make a skateboard rack.

I am Michael, and I have been enjoying this fun sport for seven years. And nothing is better than having a community to share our passion for those thrilling tricks. I am ready to tell you all I know about skateboarding, showing you how to choose a good board and trick to start and how the practice goes. Stay tuned!