

Skateboard bushings often come with a price. We don’t usually make them from our end because of issues with the availability of materials. However, that is not the case with fingerboards.
Fingerboard bushings might look intricate, so crafting them seems a bit challenging. But the truth is, we can replace them without spending on new tech deck bushings.
So, let’s learn how to make fingerboard bushings from scratch. Here, we’ll explore quality alternatives for bouncy bushings and give our fingerboard trucks a smoother, sharper turn.
Table of Contents
What You Need
As mentioned, we will attempt to replace worn and unresponsive fingerboard bushings at ideally no cost. So, here’s what to prepare.
- An old bike tire tube – This rubber tube will be the primary material for our bushings. We don’t need the entire body. Only a few inches will do.
- Scissors – We need to shear the rubber and shape it to mimic a bushing’s body. So, let’s secure a pair of sharp scissors.
- A nail – We will be poking a hole through each rubber piece using this hardware tool.
- A fingerboard tool – After we finish making the bushings, we’ll have to put them on the trucks. Hence, we should secure a fingerboard tool to mount and reinstall the parts.
Making a Fingerboard Bushing: Step by Step
Considering how skateboards turn sharply with quality bushings, we also want our fingerboards to do the same. So, let’s begin the process.
Step 1: Cutting the rubber
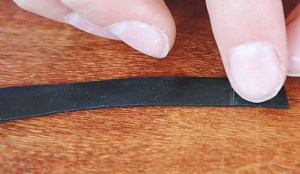
Remember, we prepared a few inches of a bicycle rubber tire.
Take your fingerboard tool and dismount the truck hanger by loosening the kingpin nut. Remove the existing bushing and place it flat against the rubber tube.
We don’t need a fingerboard bushing mold here. You only need to press the original bushing against the rubber piece to leave an impression of its size and shape.
Grab your scissors and cut through the round shape. You may crop a broader circle, but that is entirely up to your preference.
Since the bike rubber tube is thin, prepare at least eight rounded pieces so you can increase the thickness of the combined new bushings.
Step 2: Piercing bushing holes
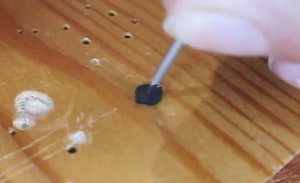
We now have eight round rubber pieces shaped and sized. It’s time to poke holes in these pieces.
Lay one round rubber on some scrap wood or a surface a nail can penetrate. Grab one hardware nail and align the nail’s tip to the center of the rubber piece.
Take a hammer or another similar object and smash the nail’s head enough to pierce a hole through the rubber piece. Never overdo it because it will render the hardware hard to pull off the surface.
Once the nail is through the rubber, slide your bushing across the nail to stretch the hole. This way, we’ll have an easier time installing the rubber bushings later. Repeat the same steps with the rest of the rubber pieces.
Step 3: Installation
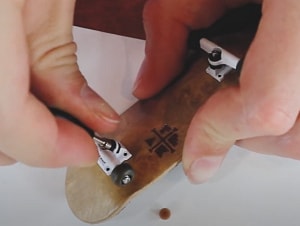
We now have the new rubber bushings ready. In this step, we’ll follow a portion of the installation process for skateboard trucks.
Begin by removing the truck hangers and all their bushings from your fingerboard. By now, you should only have the baseplate and kingpin left on your deck.
Slide two rubber bushings on the kingpin bolt. Place the truck hanger and follow with another bushing. Lock the parts using the kingpin nut.
Repeat the process with the other truck. Now, you have two rubber bushings left, and we won’t need them anymore unless you want to add one more on each side.
Finally, you can try your new improvised bushings by riding and turning your fingerboard here and there.
Frequently Asked Questions
What do fingerboarding bushings do?
Skateboard bushings make skateboard turns sharp, smooth, and precise. Are these features also possible with their fingerboard counterparts?
Yes! Let’s divide them into two categories: soft and hard bushings.
Softer fingerboard bushings are for loose trucks. They are the best options for fluid turning. On the other hand, hard fingerboard bushings make cornering stiffer, which is also a benefit for some users.
Overall, the best fingerboard bushings give us just the maneuverability we need.
How do you put bushings on a fingerboard?
We just discussed how to install homemade bushings. Let’s see if the same process applies to branded tech deck rubber bushings with these steps.
- Remove the lock nut on the trucks.
- Detach the hangers, original bushings, and washers until only the baseplate and kingpin are left.
- Slide the bottom bushing on the kingpin bolt with the narrower side out.
- Place the truck hanger back and follow with the top bushing with the wider side facing the hanger.
- Lock the parts using the kingpin nut.
Conclusion
Whether fingerboards or skateboards, bushings play the same role – they are catalysts for smooth turns. And despite these parts being small, we can’t deny how huge their impact is when riding both boards.
And if there’s one thing we like about fingerboard bushings, it’s the reality that we can craft them to mimic a branded option’s performance. Just learn how to make fingerboard bushings out of a bicycle rubber tube or any equivalent material.
From there, we might no longer have to purchase our gear. Plus, we get to customize the thickness of these fingerboard parts.
Before you go, learn more in a detailed guide on how to dye fingerboard wheels and DIY a fingerboard.

Hi, I am Charles Harris. I opened this site to write as much as I can about my biggest passion – skateboarding!
I started as a clumsy yet passionate rookie 10 years ago to now a still passionate yet much better skateboarder! But I have to tell you, the whole journey has always been fun and rewarding, indeed not without hardship.