

Old skateboards do not necessarily deserve the trash. Unless they’re completely useless, creative people can transform them into something valuable, like shelves, chairs, and other decorative fixtures.
But did you know you can also make jewelry like rings from a skateboard? If not, let me teach you how to make skateboard rings from an old skate deck.
In this tutorial, we will learn to be more creative with old skateboards and carve out more objects that are potentially profitable. From there, you may develop a new, fun, and fulfilling hobby.
Table of Contents
What You Need
Yes, we’re making jewelry. But we’re not working with cardboard, steel, or other alloys. Let’s focus more on woodworking and prepare the following.
- Old skateboard – You need not search for a whole skateboard deck because all you need is a chunk smaller than your palm size — that is, until you decide to create more.
- Ruler and compass – Regardless of the shape of your fingers, rings have a perfectly round form. Hence, we need a compass to achieve that. Add a ruler for all the marking procedures.
- Pencil – We’re cutting through a solid object. Thus, we need a pencil to mark the appropriate cutting areas and measurements.
- Drill with Forstner bit – The best tool to create the inner rim of the ring is a Forstner bit because of its round tip. When picking the bit’s size, ensure that you have considered your desired ring size. So, use a drill bit slightly smaller than the planned ring diameter.
- Saw and sandpaper – Forstner bits are for the inner ring shape, and the saw is for carving the outside. And after achieving the ring’s form, it’s the sand paper’s role to polish the recycled skateboard jewelry.
- Wood oil – We need to oil the ring to give it a nice and neat feel.
Steps to Making a Skateboard Ring
Like a Baker skateboard ring, DIY rings require patience and skills to create. So, try to go over these steps carefully to achieve your goal.
Step 1: Cutting a chunk off the deck
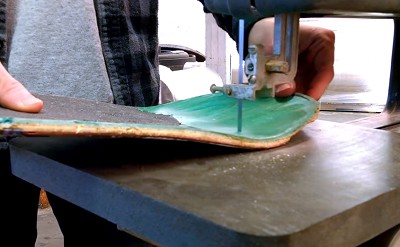
The first thing we do is to take a portion of the skateboard’s deck to transform it into a ring.
So, take your pencil and ruler. Draw a square on the deck with sides of about 5 cm. Cut through the shape using your saw.
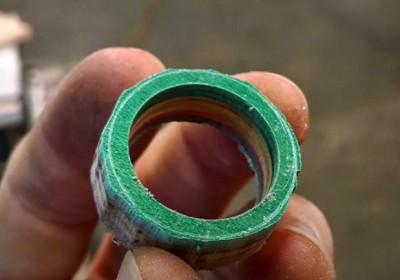
Now, you have a handy piece of the cut skateboard deck. Point the compass needle on the center of that deck chunk. Draw a circle on the board. Ideally, it should be 5mm broader than your planned ring size.
Step 2: Drill a hole
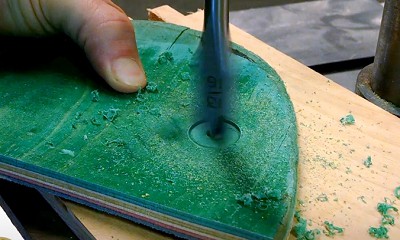
Depending on your desired ring size, use a Forstner bit narrower than your recently drawn circle. That way, you have enough ring thickness for sanding.
Pull the grip tape off the chunk of the skateboard deck you cut. It would be much better if you could find a clamp to hold the board when drilling. But don’t worry if it’s not available. Our goal is to ensure we drill a hole at the center.
So, take your drill with the appropriate bit. Make a hole at the center of the chunk of the skateboard deck. Do it slowly until the bit clears the entire deck’s thickness.
Step 3: Shape the ring
We have finally achieved the inner round shape. It’s now time to cut out the outer circle.
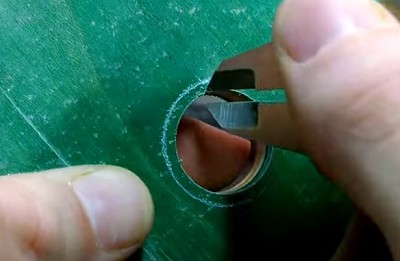
We don’t have to cut the board to the ring’s planned thickness this early. Our target is to have a rough rounded wooden circle first.
Take your saw and cut the jewelry’s shape based on the circle we drew. This process takes a lot of patience, especially since you want the shape to be accurate. Thus, stay patient until you complete the round cut on the piece of deck.
What saw to use? The best cutting tool for this tutorial is a scroll saw. But if you don’t have the luxury of having it, you can borrow or use a different saw suited for the process.
Step 4: Sanding
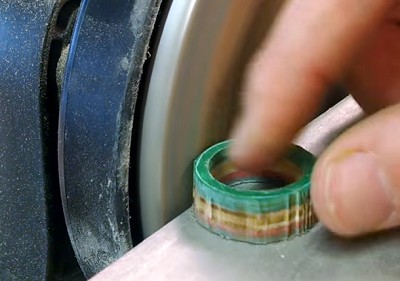
We will perform two sanding procedures in this step, one on the outside and another inside. Let’s begin sanding outside.
If you have a bench sander, great! Otherwise, sandpaper is still a wise choice.
Now, take your grit paper and sand the outside of the ring. Keep sanding until you achieve the perfect silhouette of an accessory ring.
Next, we’ll polish and sand the inner circle of the wooden jewelry. Still, with the sandpaper, scrub the inside of the accessory. Ultimately, run the grit sheet on the ring’s edges for a more refined feel.
Step 5: Finishing
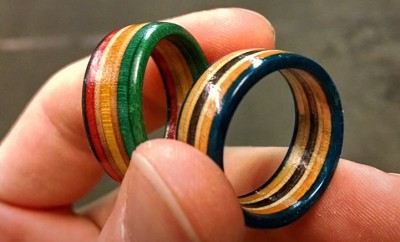
This step is a combination of polishing and creativity. Let’s begin to polish the ring.
Take the wood oil of your choice. Grab a paper towel and apply a few drops of the substance.
Rub the oiled paper towel on the ring. Ensure to cover all sides of the jewelry. You can repeat oiling for a second layer for a more polished look.
Next, you can apply some designs you want. Some like their recycled rings to show off the skateboard deck’s layers, while others cover the surface with other art.
Note that this part of the step is entirely optional.
Tips to Shine Your Rings
We’ve already discussed one method for shining wooden skateboard rings. And that’s using wood oil. What other ways do we have?
- Polyurethane spray – Yes, polyurethane isn’t only present on wheels and bushings. Sometimes, they come in bottled forms to make wooden furniture look better.
Not only that, but polyurethane sprays also protect the wood object from water damage and staining. Besides spraying, you can also use a brush to polish the skater rings.
- Homemade oil – There are many recipes to make wood oil at home. One of the most common ingredients used is Boiled Linseed oil. The application process could be similar to the previous medium.
- Buffing – This method is best after oiling the ring’s surface. All we do is allow the substance to sit on the wooden jewelry and polish it with our buffing tool.
Costs to Make Skateboard Rings
Skateboard brand rings cost high enough when we purchase them from stores. But with this tutorial, here’s what we only have to spend.
- Old skateboard – Essentially, old skateboards might not cost much anymore. It would be virtually priceless if you use your worn-out board instead of discarding it.
- Stationeries – You can find pencils almost anywhere in your house. Rulers may only cost a dollar or two. Better if you also have one at home. Similarly, a pencil compass only costs less than $3.
- Drill – Depending on the size, Forstner bits range from $8 to $36. The hand or power drill costs significantly higher, but not if you have someone to lend you one.
- Saw – The cost of a scroll saw is around $120 at the least. It may not be necessary yet for beginners, but it’s a good investment if you plan to make skateboard rings as a business.
- Sandpaper – A sheet may cost only a few cents. But a set could go as much as $5 or higher.
Conclusion
Skateboard rings may not be as popular as other recycled skateboard products, but they are profitable. Not only do you work your creativity out, but you also help lessen skateboard waste.
Perhaps, learning how to make skateboard rings is only one of the undiscovered innovations after a skateboard’s life ends. With your imagination paired with the appropriate tools, every old skateboard can come back to life, only with a different purpose.
The steps are simple, and it’s up to you to design your first skateboard ring.

Hi, I am Charles Harris. I opened this site to write as much as I can about my biggest passion – skateboarding!
I started as a clumsy yet passionate rookie 10 years ago to now a still passionate yet much better skateboarder! But I have to tell you, the whole journey has always been fun and rewarding, indeed not without hardship.