

Sometimes, what makes us lose some speed during skateboarding is a bunch of road obstructions. These issues include cracks, curbs, and any other object where skateboards cannot pass through. In effect, we cannot enjoy riding our boards in these areas.
But don’t worry. I have one way to get through these problems. Let me show you how to ollie on a skateboard and hop over these obstacles like a pro. Here are the main procedures we need to follow for the entire tutorial.
- Foot positioning
- Tail-snap and jumping
- How to land properly
What You Will Need
Learning how to do an ollie will require you the most appropriate setup of your board and skating area. Here are the things you need.
1. A skateboard for ollies
The board you use for kickflips and street skating has to be the same as ollies. Let’s start with the deck. Your board, as a standard, should be at 8″. This size fits most riders, regardless of age and level. Also, it’s best to have a depressor-shaped skateboard for these occasions. Plus, a good quality grip tape may also help stabilize your feet in the middle of the board.
For the trucks, always pick an aluminum alloy pair of trucks. You will do countless jumps when doing ollies, so be sure your trucks are durable and are of the right tightness as well. And for its size, try to look for a 149mm width.
The last skateboard component you have to consider is the wheels. A wheel size ranging from 52mm to 58mm would be ideal for ollies. But if you are a teen or someone lighter than most adult riders, the 52mm wheels will be a good choice. Plus, if you want to give your tricks some pop, it’s best to have a wheel hardness of 97a.
2. Road seams
You will be going over these after perfecting an ollie, but for now, you will have to use them for a stationary ollie. The best location to find a straight road seam is your village street.
Later on, you’ll have to stick your back wheels on it to keep you stable when you start doing the trick. Also, when searching for road seams, make sure they’re not on busy roads. That way, you’ll have fewer distractions for practice.
3. Humps and rails
You won’t have to use rails or low road obstacles too early in the ollie process. But these will eventually help you make your ollie higher. While a skate rail is famous for grinding, it can also be a perfect starting point when doing ollies in movement. So, the best thing to do after practicing a stationary ollie is heading to a skate park.
For the road humps, you can find it almost in any street. But if you don’t find one, you might as well use any object to challenge you to achieve good heights for ollies practice.
4. Safety equipment
Ollies belong to intermediate-level skateboarding tricks, which is why you need a heightened level of safety. One of the common injuries skateboarders experience is an ankle sprain. These damages often occur after landing the wrong way, bad habits, falling off the board, or losing balance.
With this, you will need ankle support. This protection could be a brace or a compression sleeve with silicone inserts. Ankle injuries last from a couple of weeks to months for chronic cases. So, you have to protect your ankles from these.
Another set of safety gear you need will be knee and elbow support. By having these, you get to protect your joints in case of an accident. Also, you have to guard your knees, especially that you’ll be jumping throughout.
Steps to Doing an Ollie While Skateboarding
An ollie could be the first trick you’ll learn in skateboarding. The goal here is to pull up and grab the board using your feet alone. And to be sure you’re doing it perfectly, follow the procedure details below.
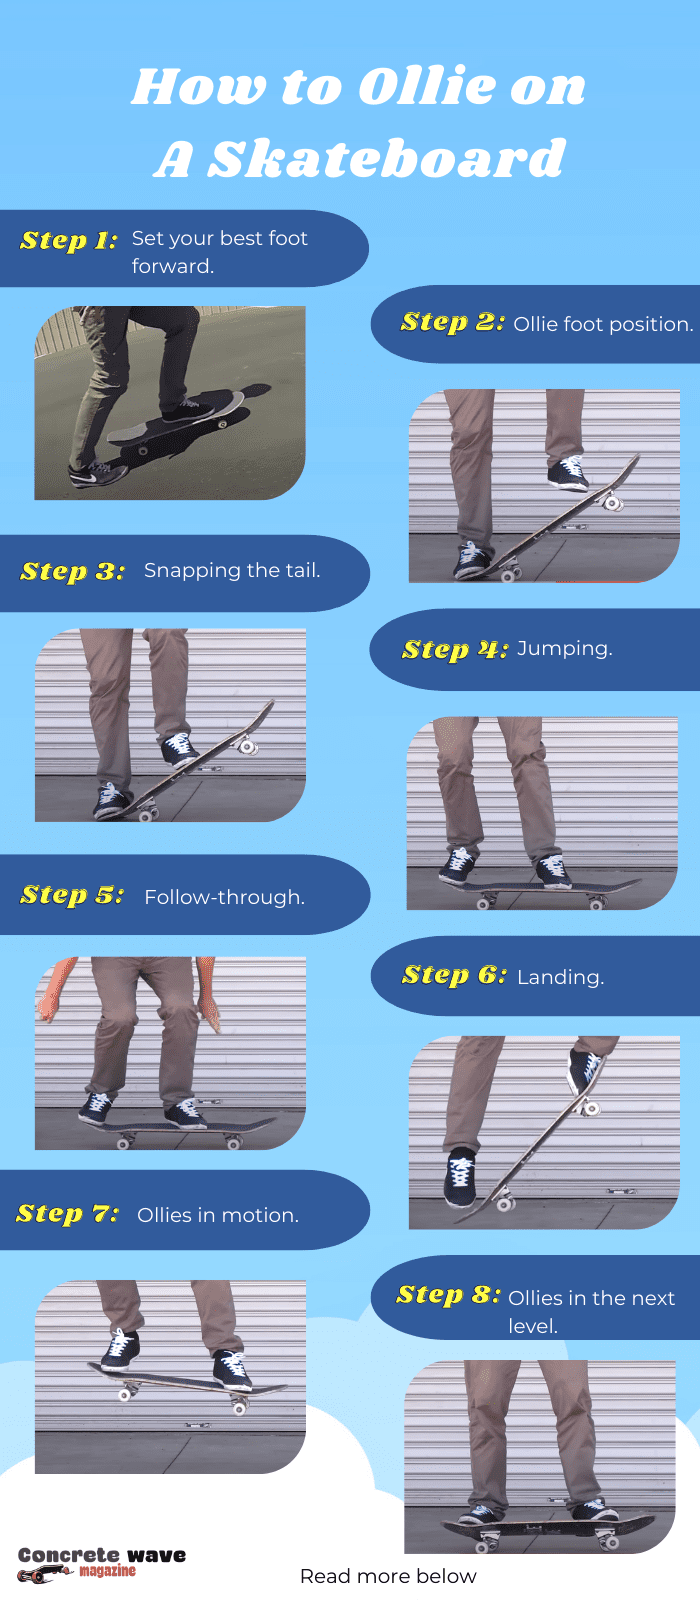
1. Set your best foot forward.
Whether doing an ollie on a skateboard for beginners or pros, we need to ensure you’re using the most appropriate foot at the middle front and on your board’s tail.
This aspect makes the skateboard trick easier for you by improving the controllability of the board. Start by riding the skateboard slowly with your left foot flat in front and swapping it with the right.
Assess which among the two makes you feel most comfortable and confident. By then, you’ll know which one is the best foot in front.
2. Ollie foot position
The only way to make a perfect skateboarding take-off is by beginning with the appropriate foot placement. And to ensure your stability, set the back rollers of your board to the road seam you found.
To achieve the proper positioning, begin by facing the length of your skateboard. Place your front foot somewhere between the center of the deck and the inner bolts of the front truck.
Also, your toes should align with the deck’s edge. Next, put your back foot at the tail of the skateboard. Like your front foot, try to align your foot slightly to the tail’s edge to push and slide more easily later.
3. Snapping the tail
Another step that requires comfort is snapping the skateboard’s tail. In this procedure, your feet will need to balance over the rear trucks of the board.
All you have to do is pop on the back of the skateboard as the tail hits down. That way, you will lift the front part with only the tail and the wheels at the back touching the ground.
Then, press the front part of the skateboard to even it back while standing. Ensure comfort in lifting the board by repeating the snap-and-drop process.
4. Jumping
This step requires the most leg and feet work as you have to incorporate two actions at once. Still, with your rear wheels on the road seam, perform the tail-snap process. But this time, you will need extra force.
To do this step, bend your knees in preparation to jump. Next, jump from the board, pressing on its tail hard and with your front foot lifted higher. It’s like jumping with your feet moving in opposite vertical directions.
5. Follow-through
Let’s try to emphasize this step since this is where you’ll get to even your board on air from its nose. Immediately after taking off from the ground with your skateboard, glide your front foot up to the board’s nose.
This procedure will pull your board from a diagonal position to a horizontal one. Your back foot should follow the tail of the board as soon as it evens out. That said, you don’t only level your board but your feet as well.
6. Landing
Be ready to land with your skateboard in a flattened position. Of course, you will feel some impact running from the ground towards your body once you land.
The essential technique to absorb this force is to bend your knees once the board hits the ground.
Keeping your shoulders straight may also help you obtain balance immediately. You don’t want to fall off your skateboard by landing straight on a stiff body. You have to adjust your body to the motion of the board. That way, you won’t feel like countering the impact from the ground.
7. Ollies in motion
Ollies in the middle of some momentum or movement mark its successful execution. You need not be too fast before doing the ollie. All you need is a bit of momentum to prepare you for the trick.
Let’s start by riding the skateboard. So, after pushing with your skateboard, go for the proper foot position. Once you feel ready and there’s enough motion, execute the snap and jump procedures simultaneously. Don’t forget to do the follow-through with your front foot quickly. Lastly, be sure to obtain your core on air as you land for stable standing.
8. Ollies in the next level
The last thing you want to do with a trick like an ollie is reaching your jump’s highest point or maybe its farthest distance. The best way to train yourself is by starting with low ramps. With the help of some humps or rails near you, try to go ovevr them by doing an ollie. These objects will challenge you to master the timing and execute the jumps well to avoid them.
Later on, you want to get down some stairs in between two flat surfaces. It won’t be hard to perform since you’ll have enough height in the air to prepare for landing.
Pro tips
- Timing is the key. Once you master snapping and jumping at the same time, it will help you achieve a higher ollie.
- You can also start practicing a stationary ollie on the grass. Your skateboard is less likely to move, and falling off it won’t hurt too much.
- Try to learn defensive skateboarding should you fall on your board when doing the ollie trick. It’ll help you avoid injuries with your feet, legs, knees, ankles, or any body part.
- Balance is a vital technique. Always perfect balancing in the progression of the trick.
- It’s also good to watch youtube tutorials to explore different levels of this skateboard trick.
Conclusion
Ollie skateboarding is like flying with your skateboard. And if you’re someone who loves some thrill, this skateboard trick should never miss your list.
Knowing how to ollie on a skateboard is not only an addition to your skill. It’s also one way of getting through road obstacles and maintaining some momentum. So, always keep the tips I have shared with you to incorporate this trick into your skateboarding routine.
Have some fun skipping cracks and road curbs. Did you enjoy this tutorial? Don’t forget to leave your thoughts in the comments section.

I am Michael, and I have been enjoying this fun sport for seven years. And nothing is better than having a community to share our passion for those thrilling tricks. I am ready to tell you all I know about skateboarding, showing you how to choose a good board and trick to start and how the practice goes. Stay tuned!