


Skateboard decks are indeed attractive with their many designs. Besides, some are colorful. You can buy them at skateboard stores and simply pick your preference.
But, would you like to customize the skateboard deck that can speak more of yourself? Why not try painting your deck? Here are some steps on how to paint a skateboard deck and make it more appealing to you.
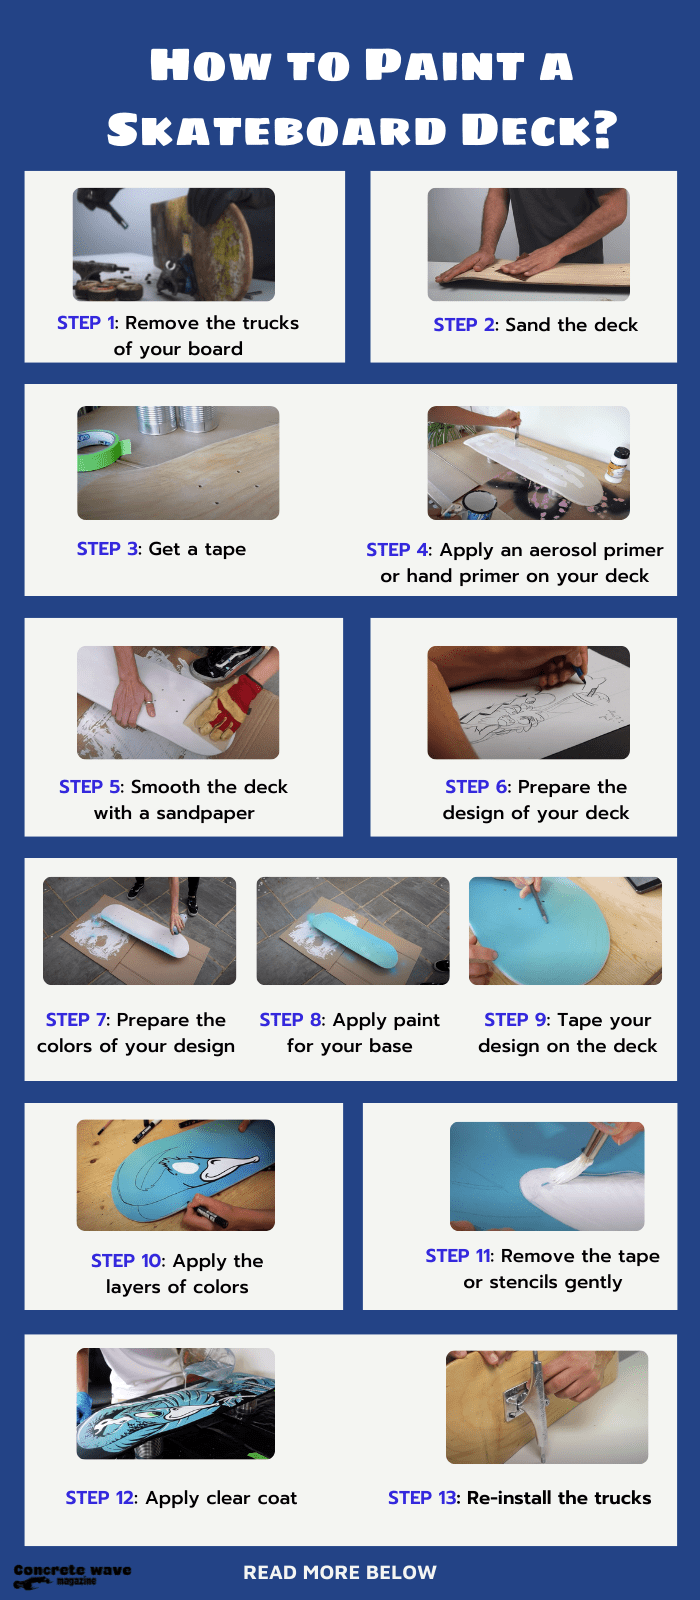
Table of Contents
What You Need in Painting Your Deck
Customizing your deck by painting takes effort and skill. Also, you will be needing the following materials:
- Sandpaper
- Aerosol primer or any primers
- Stencil with the design you like
- Tape
- Spray paints
- Clear coat
You may spend a little on these materials. But, they are worth having a complete and customized deck for yourself.
Painting a Skateboard Deck in Easy Steps
You can customize a skateboard deck using spray paint. On the other hand, if you are good at hand painting, you may do it too.
This will make your deck more unique and personalized. Meanwhile, here are the steps for painting a deck using spray paint with the design of your choice.
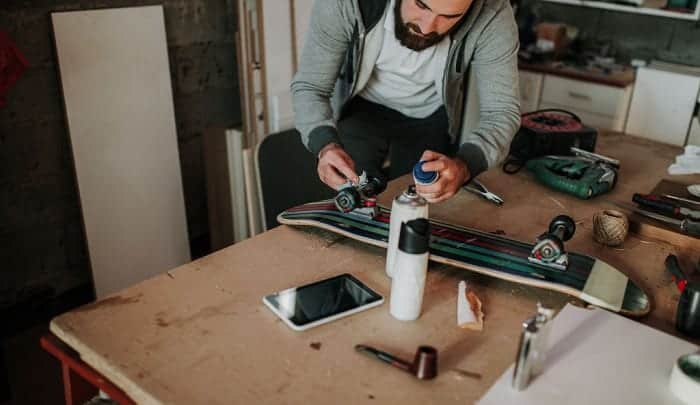
1. Remove the trucks of your board
First, get your skateboard deck and remove the two trucks carefully. Store them in a safe place. And be sure that the components of the trucks are complete when you reinstall them in your deck once you have completed painting your board.
2. Sand the deck
Get fine sandpaper or 400 or 320 sandpaper. Sand your deck in a circular motion. Polish it well. Then, get a sponge and soak it in warm soapy water. Rub the soap sponge on your deck. After washing your deck, let it dry for a few minutes. This will make your paint sticks to your deck well.
3. Get a tape
Bind the tape on the top-side screw holes and the sides of your deck carefully. If you are not able to tape them, there will be drips on the grip and sides of your deck.
4. Apply an aerosol primer or hand primer on your deck
Coat your deck with a primer. You may use an aerosol primer or a hand primer. Spray the primer evenly to the deck. Do not make it thin or thick just make sure it covers your deck well.
Keep in mind that you have to dry each layer of the primer completely before you coat it with another layer. You may at least dry it for 30 minutes for each layer of primer. Also, do not forget to wear protective eyewear or mask when spraying the primer.
5. Smooth the deck with a sandpaper
Once the primer is completely dry, you may re-sand the board with 150-grit sandpaper. Remove any blisters or bubbles using the sandpaper. Do this gently in back and forth movements. Also, get rid of the primer sawdust once you are done sanding using a wet cloth and rag. Then, dry your deck.
6. Prepare the design of your deck
Get a piece of paper and sketch your design for your board. The design will be your preference. Consider the proportionality of the drawings. Also, think about the colors you are going to use. You may mask your design on the board.
7. Prepare the colors of your design
If you are going to use four colors for your design, you must apply four layers of paint. You may number the designs you created to know which one you are going to paint first.
8. Apply paint for your base
The base color will be the background of your stencil design. It is advisable to use white or black to make other colors stand out in your design. Make sure to spray the base evenly with the color of your choice.
9. Tape your design on the deck
Using a stencil with your design, tape it to your deck. Be careful in taping your stencil. You may use materials such as tough card stock, mylar, or cardboard.
10. Apply the layers of colors
The opening or the spaces in your stencil will be the color of the second layer. Spray your choice of color on the board evenly. You may do the same on the next layer until it finishes your design. On the other hand, be sure that the layer of paint is completely dry before you spray paint the next layer.
11. Remove the tape or stencils gently
Once the paints are dried, you may remove the tape or stencils gently. Simply, drag them slowly one by one. Once done, you will see your complete design.
12. Apply clear coat
Let the paint of your deck dry completely. Then, give it a clear coat to make it shine. Also, it will protect your paint from the ultra-violet rays of the sun.
13. Re-install the trucks
Finally, after the coat is dried, you may re-install the trucks. You now have your finished painted skateboard.
If you want to level up the painting of your skateboard using hand painting and acrylic paints, you may watch the video below for instructions:
The Bottom Line
Painting your skateboard deck is fun and interesting to do. Simply, choose a design that you like.
Of course, you have to exert effort for this and spend quite a little on the materials. But, no worries, the steps mentioned in this article will guide you on how to paint a skateboard deck.
If you have any suggestions about how to customize the skateboard deck, you may note them in the comment box. We are thankful for these suggestions and appreciate them very much.

I am Michael, and I have been enjoying this fun sport for seven years. And nothing is better than having a community to share our passion for those thrilling tricks. I am ready to tell you all I know about skateboarding, showing you how to choose a good board and trick to start and how the practice goes. Stay tuned!